This was the first day of working on my project:
(9/15/16) The subheadings and such below is the proposal for my project.
DESCRIPTION:
The project that I wish to do, is a much like a robotic scare crow, that’s meant to make cats stay away from places they're not suppose to be or rather just an anti-cat robot made out of Lego robotic pieces.
PURPOSE AND OBJECTIVES:
Anywhere from one month to the whole semester
BUDGET/RESOURCES:
Me – All semester – I have no idea how
SOURCES:
http://www.nxtprograms.com/NXT2/multi-bot/steps.html
http://www.nxtprograms.com/projects2.html
Pieces:
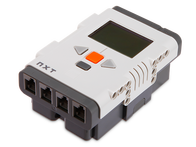
Programmable brick
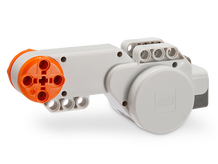
Large motor (2)
Medium motor
Infrared sensor
lego connector pieces
(9/15/16) The subheadings and such below is the proposal for my project.
DESCRIPTION:
The project that I wish to do, is a much like a robotic scare crow, that’s meant to make cats stay away from places they're not suppose to be or rather just an anti-cat robot made out of Lego robotic pieces.
PURPOSE AND OBJECTIVES:
- To remove cats
- To make noise that would alarm the detected cat menace
- To be mobile/ to be able to move on its own
- Have moving parts that would aid in removing the feline
- In terms of feasibility, I'm sure it could be done.
- Scare crows have been done before- robotic ones included and that's basically what this would be with a bit of a difference.
Anywhere from one month to the whole semester
BUDGET/RESOURCES:
- Budget is non existent
- The Lego sight has a lot of things on robots using their products, also reddit.
- It can move
- Makes a racket when sensors are triggered
- Has something that moves
- Looks like something a cat would find threatening
- Would probably scare a cat away
- Programming
- Getting all the pieces to work together and the overall design
Me – All semester – I have no idea how
SOURCES:
http://www.nxtprograms.com/NXT2/multi-bot/steps.html
http://www.nxtprograms.com/projects2.html
Pieces:
Programmable brick
Large motor (2)
Medium motor
Infrared sensor
lego connector pieces
|
|
(10/14/16)
This is our first day in class to work on our project and I have spent it researching and learning how to make a robot using Lego, mostly how to program a Lego brick and the program used to do so. The mindstorm web site was were I started and since it is the official site for Lego robotics, it was useful and I spent most of my time today watching videos on how to program the basics. I am confident I can find videos on more complicated programs on youtube.
the mindstorm website can be found here: http://www.lego.com/en-us/mindstorms/learn-to-program/
Some of the instructions that I looked at when researching what I was going to do for my project, had the program with the instructions, so I may be able to use or adapt one of those to get it to work, I plan to look into it when I know a little more about programming.
(10/17/16)
haven't done a whole lot today looked more into programming, found some more videos on how to program.
https://www.youtube.com/watch?v=6e2Z87KAzMw
I have found a program that was used by another to make their robot work its:
http://www.nxtprograms.com/programs2/ClawStrike.rbt I don't know if it works or will work with what I want to do.
i also asked the teacher about it
(10/31/16)
someone has actually visited this site, poor you. I'm going to be gathering my parts and building the basic structure soon. Ive had trouble logging in to weebly from internet explorer, with it logging in but then popping up and saying you need to log in to continue and not letting you exit and am now logging in from firefox.
(12/1/16) and (12/2/16)
Soon? so that was a lie, its been a month. Whoops. However, this is due by the end of term and therefor im going to be actually working on this at a better rate and consistency(or at least that's what i tell myself). I might even form a pattern with my work effort, that could resemble a schedule, at the very least i will work on it on Fridays.
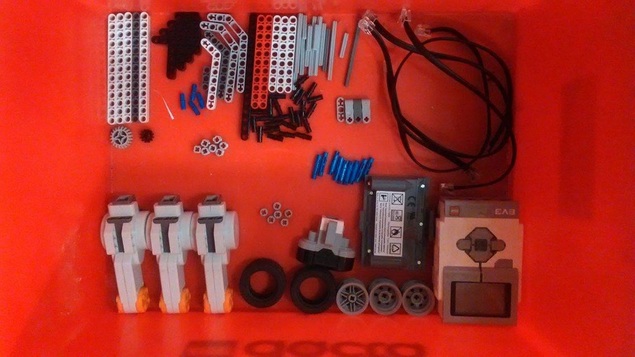
Parts: (The colours don't really matter but are there to show what they are in the picture)
1 Brick
3 Motors
3 Nine hole pieces
1 solid medium piece
26 small black pieces
4 small end pieces
14 long blue connector pieces
6 short blue connector pieces
4 two holed with an end piece
1 thirteen hole piece
4 L shaped 3 BY 5 piece
battery
2 bigger L pieces
2 35cm cord
1 20cm cord
3 medium solid pieces
7 thicker end pieces
3 axles
2 plastic wheel covers
1 25 hole piece
1 two way ender piece
(12/9/16)
Because I can't count apparently, the picture above is not including all the pieces :-( whoops. The Piece list is, however, correct. I have got the chaise done, i only manage to put pieces on upside down once or maybe twice
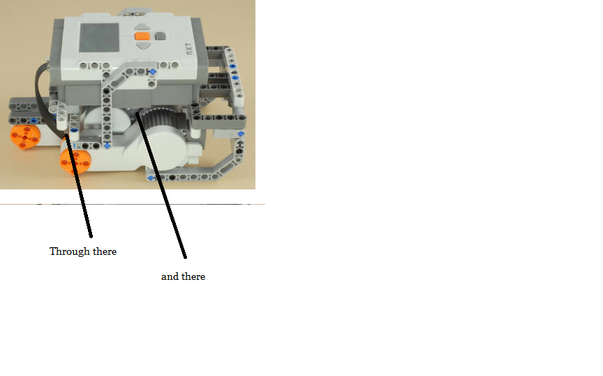
* I am using the instructions from here: http://www.nxtprograms.com/NXT2/claw_striker/index.html I chose the alternate choice with the wheel because it was too flimsy. I also did not like how they had there first cable passing through where the motors are, under the bot. I passed mine under the brick and through the back. less friction and problems. keeping all wires close to the bot seems to be a good idea as i don't want then to interfere with the arm that's going to be added.
(12/18/16)
After the snow days i am back to work on ... this.
(1/12/17)
Why oh Why do i suck so badly at actually getting this done or at least anywhere close to done. Today is yet another snow day that i didn't want or need. I'm a bit behiend on this. Tomorrow better not be a snow day.
(1/16/17)
It wasn't a snow day, Friday but life got in the way so whatever. I'm still quite a bit behiend (Dooooomed) or maybe I'm just being melodramatic.
Ive managed to get all the mechanical parts done and am now improvising changes as i see fit, as such i am now creating the program that will make it operational.
(1/17/17)
I've been researching and working on the program today at home since it's another snow day, today and will transport it by USB to my box
https://www.youtube.com/watch?v=E-qSs8Bihmk
https://www.youtube.com/watch?v=HfOxI4kfjok
below is the very first sort of idea for a code, currently untested. I do not advise using it.
| lego_project.ev3 |
(1/18/17)
I've spent today working on the code. I borrowed someones else's box to use mind-storm and someone has offered to help me with the coding, which depending on how this goes today i may do that. I have taken off the arm until the arm code is proper to avoid unnecessary hacking of limbs or anything else. I've had a bit of trouble with loops due to getting the greater and lesser than signs backwards in certain parts of the code, but that's a simple fix.
(1/19/17)
I've had a bit of trouble with the code, but not too much. I have a part of the program that loops for a certain condition and it is currently getting stuck in the loop, to fix that I'm going to change the loop conditions and try to find out why its getting stuck. After i finish that I'm done with the code (hopefully) and will upload it here. I have reattached the arm and it is working well.
| testing_code.ev3 |
(1/20/17)
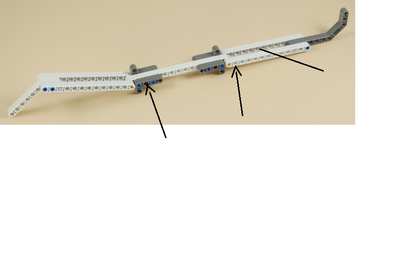
Ive finished the code and made adjustments to the swinging arm, so that it still swings but no longer viciously attacks the ground. I added another piece where the line between the two other pieces, as indicated by the line, i attached it with two long blue pieces, the first one was the first hole by the arrow and the other is the last hole on the far side. I attached a piece where the arrows point with a small black connector piece where the L shape piece is and a long blue connector piece that ties in with the newly added piece in the middle.
Ive finished the code and made adjustments to the swinging arm, so that it still swings but no longer viciously attacks the ground. I added another piece where the line between the two other pieces, as indicated by the line, i attached it with two long blue pieces, the first one was the first hole by the arrow and the other is the last hole on the far side. I attached a piece where the arrows point with a small black connector piece where the L shape piece is and a long blue connector piece that ties in with the newly added piece in the middle.